Block Planters
Step 1
A large planter makes a bold statement in front of a home or on a porch. Fill its wide mouth with a number of different flowers to create a living bouquet. Unlike smaller planters, you should not fill large planters with soil. It will make the planter heavy to move inside and outside as the weather changes. And, the plants don't need all that soil. Substitute some of the volume with lightweight material and your plants will grow just as happily as in any other container.
Step 1
Approximate the adult height of the largest plant that will grow in your planter. Add 2 to 3 inches. When in doubt, 1 foot of soil is usually sufficient.
- A large planter makes a bold statement in front of a home or on a porch.
- Substitute some of the volume with lightweight material and your plants will grow just as happily as in any other container.
Step 2
Fill the bottom of the planter with polystyrene packing peanuts. Allow enough space in the top of the planter to accommodate the depth you calculated in Step 1.
Step 3
Spread two to three sheets of newspaper over the top of the packing peanuts to prevent the planting mix from falling through.
Step 4
Fill the top of the planter with lightweight planting mix to within 1/2 inch of the lip of the planter.
Tip
If you will move your large planter seasonally, consider using a plastic planter as opposed to a clay planter. They look like clay, but are much easier to move. Do not use biodegradable packing peanuts when filling your planter. The water will dissolve them.
Step 1
Fill the bottom of the planter with 1/2 inch of charcoal followed by a 2-inch layer of broken flower pots, rocks and gravel. The mixture should be solid enough to hold up the potting soil, but have enough empty spaces so water can drain through.
Step 2
Fill the pot with potting soil, leaving an inch of space at the top.
- Fill the bottom of the planter with polystyrene packing peanuts.
- Fill the pot with potting soil, leaving an inch of space at the top.
Step 3
Plant seeds or seedlings in the center of the potting soil. Water your planter until the soil is saturated. The excess water will drain down out of the soil and into the bottom of the container, away from the dirt and roots. As the soil in the pot begins to dry out, the water in the bottom will evaporate and be absorbed into the dirt.
Tip
If you want to change flowers during the season while keeping the same decorative pot, use the double-potting technique by planting flowers in inexpensive plastic pots and slipping the plastic pots into the decorative pots.
Step 1
To start your project, decide where you are going to have the planter located. Build it as close to it location as possible, as it will be extremely heavy.
Step 2
Cut 2- 6 inch pieces off the 2x6 board. Now you will need to cut the remaining part of the 2x6 into a 10ft long piece. Place 2 of the 4x4 posts on top of each other, using the long nails, hammer through one board into the other all the way down the board. Repeat with the other 2 posts, this gives you the sides of the planter. Turn the posts over so the nailed post is on the bottom.
- Plant seeds or seedlings in the center of the potting soil.
- To start your project, decide where you are going to have the planter located.
Step 3
Place the 10ft piece of 2x6 on the flat work surface, preferably the ground, lay one of the 4x4 sides down exactly next to it and nail together. Repeat with other 4x4 side.
Step 4
Finally, place the 6 inch 2x6 pieces on each end. Nail the piece to the post by going from the outside of the post side through to the 2x6 piece. Turn the box over and nail from the bottom into the 2x6 piece. Place right side up and fill with soil and plant your choice of outdoor plants in your new box.
Tip
We planted bulbs that will come back year after year.
Step 1
Place the planter in your windowsill or on your patio. If you live in an apartment with a balcony, you can place the planter box on your balcony floor.
- Place the 10ft piece of 2x6 on the flat work surface, preferably the ground, lay one of the 4x4 sides down exactly next to it and nail together.
Step 2
Place the thick plastic sheet into the planter, smoothing it up the sides of the planter as well. This is to hold in moisture and prevent the roots of your plants from escaping through the bottom of your planter box.
Step 3
Cover the thick plastic sheet lining the planter with a 3-inch layer of sphagnum moss. This will be used to retain moisture for the health of your plants, because planter boxes often lose moisture quickly.
Step 4
Cover the moss with potting soil. Fill the planter only halfway full, leaving a big enough space for the plants to sprout and grow.
Step 5
Plant your choice of seeds in the planter whether they be flowers, herbs or vegetables. You can even plant small fruit trees in planters.
- Place the thick plastic sheet into the planter, smoothing it up the sides of the planter as well.
- Plant your choice of seeds in the planter whether they be flowers, herbs or vegetables.
Tip
Add container plants to your home decor with tropical foliage plants such as the ficus tree or the hosta plant. Both produce bright green foliage and are hardy tropical plants that thrive indoors. Patio planter boxes can be placed against a trellis or deck railing and contain vining flowers like tea-rose vines and bleeding hearts. Many vegetables thrive in indoor planter boxes, such as onions, garlic and even carrots. Plants like these require a planter box of at least 16 inches deep. Transplant large plants such as fruit tree varieties before they outgrow the planter box if you are using an indoor container to start outdoor plants.
Warning
Do not under-water a container plant. Doing so can stimulate the roots of the plants to grow deeper, which can cause them to break through the cracks in the bottom or become so cramped that the plant eventually dies. Give your planter box garden frequent, short drinks of water to keep the root systems shallow, making the plants easier to maintain in the container.
Things Needed
- Garden or windowsill planter
- Sheet of thick black or clear plastic (to line the planter)
- Potting soil
- Sphagnum moss
Step 1
Step 1
Dig a trench in which to build the foundation for your brick planter box. Make your trench 5 to 6 inches deep and 5 to 6 inches wide. Fill with mortar — mixed according to the instructions on the bag — to a height that is level with the ground. Allow the mortar to dry for about one week.
Step 2
Spread a thin layer of mortar over the foundation and begin laying your bricks. Leave about a quarter-inch gap between each brick and fill with mortar. Use the trowel to scrape away any excess mortar that seeps out. Use the end of the handle of the trowel to tap the bricks into places. Use the level as you go to make sure the bricks are level.
Step 3
- Dig a trench in which to build the foundation for your brick planter box.
- Use the end of the handle of the trowel to tap the bricks into places.
Step 4
Lay the next row of bricks by setting each brick one-half brick length back from the one on the row below starting at a corner. Use your trowel to place mortar on the bottom and sides of each brick before you lay it and then once again to scrap away any excess mortar that seeps out over the bricks. Remember to make sure that the bricks are level. In addition, fill in the back of the bricks with mortar.
Step 5
Continue laying each row of bricks as described in Steps 2 and 3 until your planter box is the desired height.
Excerpted from the book Outdoor Woodwork **
Instructions for Tiered Patio Planter**
Workboard Square the top support with the workboard.
- Lay the next row of bricks by setting each brick one-half brick length back from the one on the row below starting at a corner.
- Use your trowel to place mortar on the bottom and sides of each brick before you lay it and then once again to scrap away any excess mortar that seeps out over the bricks.
Parallel Supports
Make sure that the three shelf supports are parallel to one another
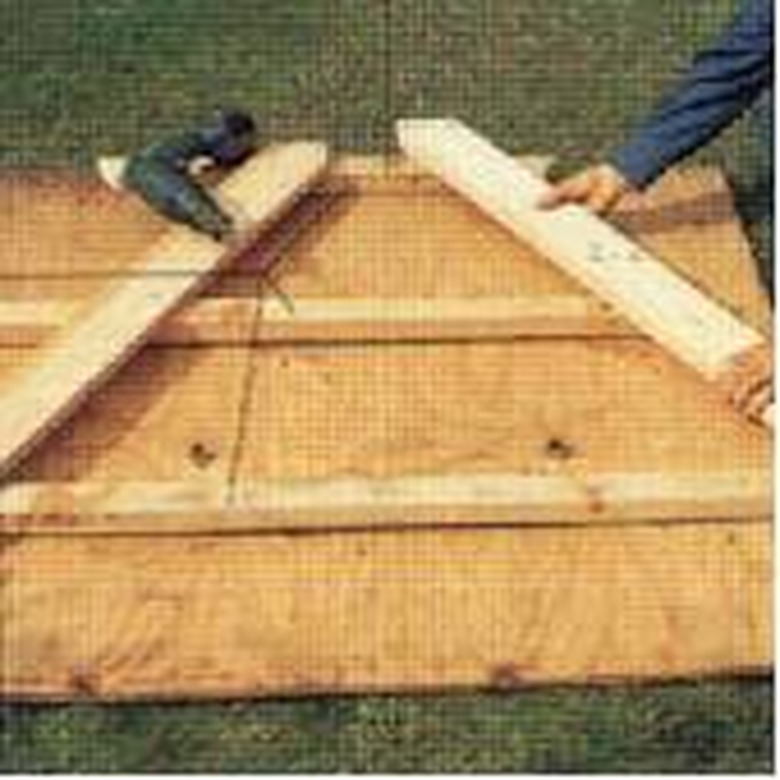
1\. Take the two legs that make the primary back frame and center them on top of the three primary shelf supports. Butt the legs together at the top, check the angles and squareness, and then drive 1 1/2 inch (38 mm) screws through into the shelf supports. Screwholes Drill holes for the screws to avoid splitting the wood Cordless Driver Charge the driver the day before you start the project
Supports Butt the supports together so that they meet on the center line. 2. Turn the back frame over so that the shelf supports are uppermost, and screw the secondary supports in place with 2 inch (50 mm) screws – so that they angle out at 60° from the center. Take care: the structure is fragile at this stage. Screwing Position the screws to avoid knots
-
Parallel Supports
Make sure that the three shelf supports are parallel to one another 1\. - Take the two legs that make the primary back frame and center them on top of the three primary shelf supports.
- Butt the legs together at the top, check the angles and squareness, and then drive 1 1/2 inch (38 mm) screws through into the shelf supports.
- **
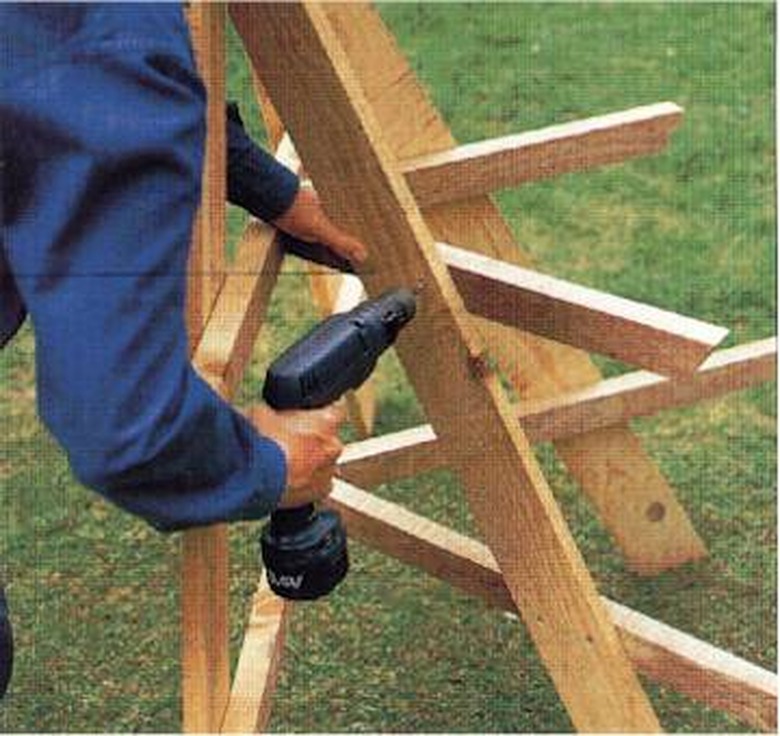
3\. Set the secondary legs in place, so that they meet at top center, and screw them to the side of the supports with one 1 1/2 inch (38 mm) screw at each intersection. Check the angles and positioning and then drive in the second screws. Helpful Hint If you find that the whole structure is difficult to support while you work, either ask a friend to help you or secure the various components together with clamps.
**>>Continued>>**
Click here for an overview **Click here for a list of tools and materials.**
- 3\.
- Set the secondary legs in place, so that they meet at top center, and screw them to the side of the supports with one 1 1/2 inch (38 mm) screw at each intersection.
- Helpful Hint** If you find that the whole structure is difficult to support while you work, either ask a friend to help you or secure the various components together with clamps.
- **
Step 1
Determine the area where you want the planter box to be. Measure the area (8 feet by 4 feet) with the tape measure. Use the spray paint to outline the area.
Step 2
Shovel out the grass and weeds inside the painted area to clear the soil of all debris.
Step 3
Dig a 6-inch-deep trench along the painted lines and as wide as one landscape timber.
Step 4
Place a landscape timber in each trench with the 4-foot sections resting inside the 8-foot sections. Lay another landscape timber on top of this first layer, nail in place with the nails on each end of the timbers, and equally spaced along the timber.
- Determine the area where you want the planter box to be.
- Dig a 6-inch-deep trench along the painted lines and as wide as one landscape timber.
Step 5
Add two more layers to the timbers and nail these in place as well.
Step 6
Measure and cut the correct size of landscape fabric to place inside the box on top of the soil. Cut a hole in the fabric in the desired location for plants.
Things Needed
- 8 8-foot landscape timbers
- 8 4-foot landscape timbers
- 16 12-inch landscape nails
- Rubber hammer
- Landscape fabric
- Shovel
- White spray paint
- Tape measure


Step 1
Dig a trench around the perimeter of your planter. Dig 8 inches deep with straight sides. Mix concrete and water in a large wheelbarrow according to package directions. Pour the trench half full of concrete. Lay two pieces of 1/2-inch rebar in the trench on all sides. Fill the trench with concrete. Let the foundation set overnight.
Step 2
- Add two more layers to the timbers and nail these in place as well.
- Dig a trench around the perimeter of your planter.
Step 3
Spread 1/2 inch of mortar on the bottom and sides of an L-shaped block. Set the block in the corner of the planter. Lay the entire first row, or course, of blocks.
Step 4
Set the second row of blocks. Set each block so its joint is centered over a block beneath it.
Step 5
Slide rebar into the space inside the block. Set 15-inch rebar into the open space of every other block. Pour concrete into the hole with the rebar to fill the space.
Step 6
- Spread 1/2 inch of mortar on the bottom and sides of an L-shaped block.
- Set 15-inch rebar into the open space of every other block.
Step 7
Set any additional rows of block you may want, depending on your planter's size and height.
Step 8
Spread mortar along the bottom and sides of a concrete cap piece. Set the cap on top of the wall. Leave two inches of overhang on the sides of the planter. Let the mortar set overnight.
Step 1
Step 1
Frame the perimeter of the tree using eight 4x4 posts. The posts should be of equal length and long enough to frame the root system at the base of the tree. Eight to 10 foot long posts suit most large trees, however you can use longer or shorter posts if you desire.
Step 2
- Set any additional rows of block you may want, depending on your planter's size and height.
- Frame the perimeter of the tree using eight 4x4 posts.
Step 3
Dig a 2 inch deep by 4 inch wide trench in a square pattern around the tree where you wish to place the posts. Fit the posts together in a square pattern around the tree and place them into the trench. Ensure the posts are flush against one another at the ends. Nail the ends together.
Step 4
Drill four holes through each post using a half inch spade bit. Space the holes evenly on every post. Mark your drill holes on the side of the post with a pencil.
Step 5
- Dig a 2 inch deep by 4 inch wide trench in a square pattern around the tree where you wish to place the posts.
Step 6
Stack the remaining four posts on top of the square frame and ensure that the ends are flush with one another. Nail the ends together. Drill through the top posts and make sure they line up with the drill holes on the bottom posts.
Step 7
Place steel re-bar into the holes and hammer down with a maul. This will keep the posts from falling over or shifting over time.
Step 8
Fill the interior of the planter box with your favorite mulch, compost, topsoil or soil amendments and water thoroughly.
Step 1
Measure and cut all the board lengths: 2 two-foot boards and 2 one-foot boards.
Step 2
- Stack the remaining four posts on top of the square frame and ensure that the ends are flush with one another.
Step 3
Place the boards on edge with the two longer boards in the front and back and a shorter board at each inside end. This should look like a frame.
Step 4
Use two brackets at each inside corner to attach all four boards together. A bracket should fit 2 inches from the top edge and the other bracket 2 inches from the bottom edge at each inside corner. Screw them in with 3/4-inch screws, the drill and screwdriver attachment.
Step 5
Place the planter box frame on top of a scrap piece of plywood that is at least 2 feet long and 16 inches wide. Draw around the outside of the wood frame onto the plywood.
Step 6
- Place the boards on edge with the two longer boards in the front and back and a shorter board at each inside end.
Step 7
Cut the plywood along the pencil markings. Place the cut plywood on top of the frame. Use screws every 3 to 4 inches at the outer parameter of the plywood to attach it to the frame edges.
Step 8
Attach a 1/2-inch round drill bit to your drill. Drill holes through the plywood, randomly. These holes will allow extra water to drain. Water sitting at root ends can cause root rot.
Step 9
- Cut the plywood along the pencil markings.
- Place the cut plywood on top of the frame.
Excerpted from the book Outdoor Woodwork
If you have ever stared enviously at the stunning displays of flowers exhibited at professional flower shows and wondered how the designers manage to achieve such beautiful cascading tiers of blooms, this project tells you how. To create a similar effect, you need to display flowers on a specially built tiered planter.
Step 1
Choose a large upright plant for the center of round planters or the back of rectangular containers viewed from one angle. This plant is referred to as the "thriller" and is typically the most dramatic plant in the container. Select an eye-catching plant for this position. (See resources for recommended plants.)
- Excerpted from the book Outdoor Woodwork If you have ever stared enviously at the stunning displays of flowers exhibited at professional flower shows and wondered how the designers manage to achieve such beautiful cascading tiers of blooms, this project tells you how.
- To create a similar effect, you need to display flowers on a specially built tiered planter.
Step 2
Plant smaller mounding plants around the focal plant. These plants, referred to as "fillers," make up the bulk of the foliage in the container. Plant five or six, depending on the size of the planter. Select plants that provide contrast in shape and color to the focal plant.
Step 3
Add trailing plants, called "spillers," around the perimeter of containers viewed from all sides, or the front of those viewed from only one angle. Trailing petunias, nasturtiums, creeping Jenny, ivies or other trailing flowers create flow and draw the eye downward. Choose plants that complement or contrast the mounding plants.
- Plant smaller mounding plants around the focal plant.
- Add trailing plants, called "spillers," around the perimeter of containers viewed from all sides, or the front of those viewed from only one angle.
Tip
Choose a planter or container that is approximately one-third the height of the tallest plants. Select plants with similar water and lighting needs.
Step 1
Cut the bottom off a milk or juice carton with scissors so that it is at least 4 inches tall, or cut the top off a foam egg carton.
Step 2
Decorate the carton. Glue a construction-paper jacket around your milk or juice carton. Color the sides with markers or paint, or glue pictures to the sides of the carton. Paint the egg carton and allow it to dry before decorating the outside with stickers.
Step 3
Cut a few slits in the bottom of your milk or juice carton with a knife, or use a toothpick to poke a small hole in the bottom of each compartment of your egg carton. This will allow excess water to drain out of the planter box.
- Cut the bottom off a milk or juice carton with scissors so that it is at least 4 inches tall, or cut the top off a foam egg carton.
Step 4
Fill your container with dirt and plant your seeds. Use labeled popsicle sticks to keep track of what you have planted.
Step 5
Water your seeds, and place the planter box in a sunny window.
Tip
Zinnias, marigolds, morning glories, peas and beans are easy to grow from seed. Rosemary, thyme, chives, dill, basil and oregano are recommended herbs for an herb garden.
Things Needed
- Milk, juice or foam egg carton
- Scissors
- Glue
- Construction paper
- Markers
- Acrylic paint
- Magazine or personal pictures
- Stickers
- Knife
- Toothpick
- Potting soil
- Seeds
- Popsicle sticks
Step 1
Place the whiskey barrel with the open end pointed upward in the planter location.
Step 2
Fill the barrel with potting soil.
Step 3
Place a wooden wash tub on top of the barrel directly on the potting soil. Position the wash tub so that it sits against the back side of the whiskey barrel.
- Fill your container with dirt and plant your seeds.
- Place a wooden wash tub on top of the barrel directly on the potting soil.
Step 4
Fill the wooden wash tub with potting soil.
Step 5
Place a wooden milking pail on top of the wash tub directly on the potting soil. Position the pail so that it sits against the back side of the wash tub.
Step 6
Fill the pail with potting soil. The three planters will resemble stairsteps.
Step 7
Place plants into the soil between the edge of each container and the edge of the container above it.
Step 1
Plant trees. Trees provide privacy, shade and shelter. Many trees grow quickly while others take years to reach sufficient height. Design your landscape to include the faster growing varieties, such as evergreens or aspens.
Step 2
- Fill the wooden wash tub with potting soil.
- Position the pail so that it sits against the back side of the wash tub.
Step 3
Design a fence or latticework and add fast-growing vines or ivy for additional cover. This increases privacy and makes the barrier pleasing to the eye. Fast-growing plants like wisteria and roses will bloom to provide a pleasant scent and a barrier between you and your neighbors.
Step 4
Build a gazebo. This structure can be as elaborate or as simple as you choose. By installing large posts and attaching awning material to create a canopy, or building a full gazebo complete with screened sides and roof, you can design the perfect sanctuary.
Step 5
Create backyard privacy by adding bamboo sheeting to a chain link fence. Attach the bamboo sheets to the chain link with zip ties or gardening string. Secure it in small intervals to avoid sagging.
Step 6
- Design a fence or latticework and add fast-growing vines or ivy for additional cover.
- Create backyard privacy by adding bamboo sheeting to a chain link fence.
Step 7
Build a planter box around the boundaries of your yard and plant bamboo. Bamboo is a fast-growing and aggressive plant that will fill your planter box and grow to a height of six feet or more in weeks. Make sure the planter box is separate from the rest of the yard or you'll have bamboo growing everywhere.