Chainsaw Sharpening Degrees
Chainsaws are used to fell trees, trim limbs, cut firewood and clear brush. Chainsaws require regular maintenance, chiefly, keeping the chain teeth sharp using a round file. The teeth must be sharpened at the proper angle to keep the chain cutting effectively and straight.
Chain Components
The chain of your chainsaw has three components: a left-hand cutter, a right-hand cutter and a drive link between the two cutters. Each cutter component has teeth with a flat top, an angled cutting edge, a gullet or valley and a depth gauge at the end. These pieces are riveted together to make the chain link.
Chain Function
Cutting links alternate on the chain, with the sharpened faces always facing forward and angles pointing to the center. They are connected with a tie strap. Each drive link will have a cutter on one end and a tie strap on the other. These links are not riveted tightly; they flex as the chain moves around the bar. The depth gauge on each cutter leads it into the wood and determines how big a "bite" the cutter will take. Cutting angles are pre-set; they usually are 30 to 35 degrees but will vary slightly among saw manufacturers.
- Chainsaws are used to fell trees, trim limbs, cut firewood and clear brush.
- The teeth must be sharpened at the proper angle to keep the chain cutting effectively and straight.
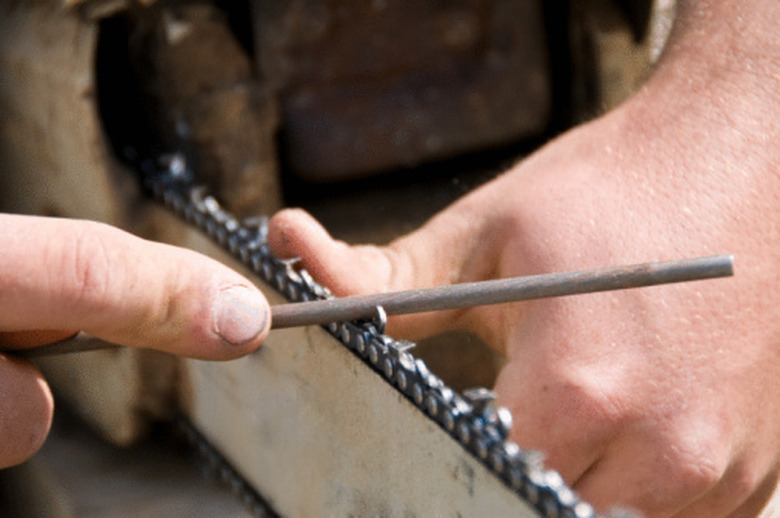
Filing Guide
Get a filing guide, or gauge, for your particular model of chain saw. This guide will enable you to use the right angle when sharpening each cutter. Most filing guides are adjustable, with a knob that shows the degrees. The guide fits on the bar and directs your round file to the tooth at the proper angle. A proper size file also must be used. File sizes vary from 5/32 to 7/32 inches. Using the wrong size file will destroy your chain's cutting angles.
- Get a filing guide, or gauge, for your particular model of chain saw.
- Using the wrong size file will destroy your chain's cutting angles.
Cutting Angles
Each cutter has three angles. The easiest angle to see is the top: the slant of the tooth you see when you look down on it. This angle should be 30 to 35 degrees. The second angle is called the top plate cutting angle. This is the bevel beneath the top plate where the sharpening file goes. Its optimum setting is 60 degrees. The side plate angle is an arc on the side plate, typically 85 degrees or less. All these angles will vary among manufacturers and even among models of saw from the same manufacturer.
- Each cutter has three angles.
- The side plate angle is an arc on the side plate, typically 85 degrees or less.
Depth Gauges
Check the depth gauges every time you sharpen the teeth. Most filing guides have a depth measurement. If a depth gauge is above that line, use a flat file to smooth it down, then slightly file the leading edge to keep it round.