How To Make A Wooden Wagon Wheel
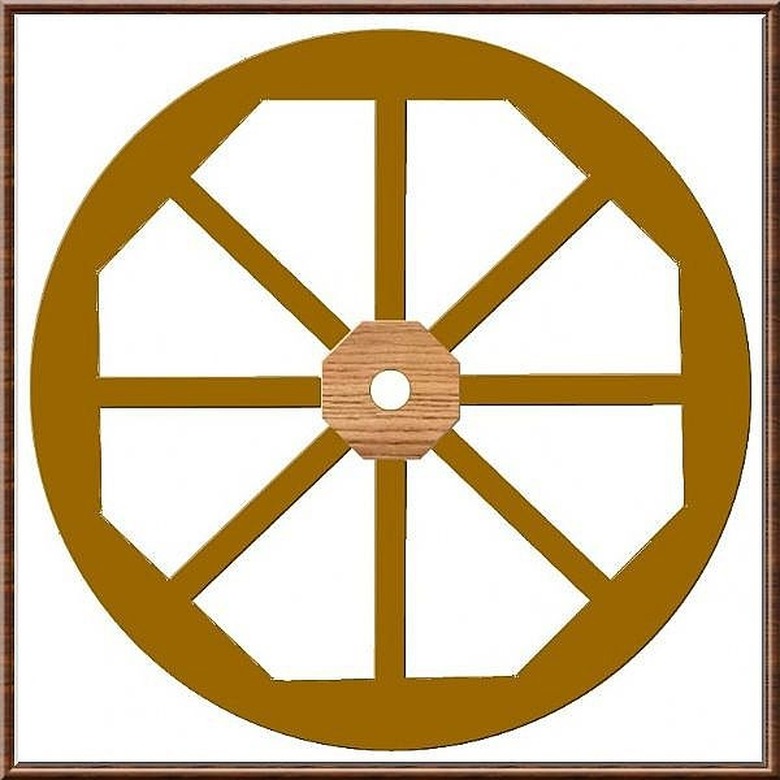
You are looking for something to dress up your landscaping; a nice looking, rustic wagon wheel! Make a wooden wagon wheel that resembles old-country farmer's cart wheels; one with that rugged look of quality workmanship and design. To make a wooden wagon wheel is not a simple task; but it is certainly do-able, and with some patience and attention to details, your decorative wooden wagon wheel will grace your landscaping any place you choose to display it. Follow these steps to make a wooden wagon wheel for YOUR setting!
Step 1
Planning: To make a wooden wagon wheel to fit your particular need, you will first need to decide on a few things: 1. What diameter? 2. How thick should material be? 3. How realistic do you want your wagon wheel to be? 4. What kind of material?
- You are looking for something to dress up your landscaping; a nice looking, rustic wagon wheel!
This article carries a few simple assumptions, such as: A. Make a wooden wagon wheel of this type for decoration only; no structural claims are made for functional use. B. This design and fabrication method to make a wooden wagon wheel is just one of a variety of possible designs and methods. C. Ultimate choice for materials, material thicknesses, assembly, attachments, and finishing of this decorative wooden wagon wheel is by your particular preferences.
Step 2
My recommendations for dimensions and materials, to make a wooden wagon wheel that is attractive and decorative, yet lightweight enough to handle safely and easily are as follows: -Wheel diameter: At least 36"; up to 48". Make from 5/4 x 6 deck board material, in eight equal arc-segments. –Wheel rim-segments: At least 1" thick; width to be whatever can be cut from standard 5/4 x 6 pressure-treated deck boards. Length is determined by dividing the chosen wheel size circumference into the eight equal segments. -Wheel spokes: Length is determined by the wheel diameter and the hub size; plus the depth of the drilled holes in those items. The diameter of the spokes is determined by the chosen thickness of the rim-segments and wheel hub. For fitting into standard 5/4 pressure treated deck board material, spokes should be no larger than 3/4" diameter, which will leave only about 1/8" material on either side of the holes (sufficient for this decorative-only wooden wagon wheel). If your local home center or hardware store carries pressure treated dowels, use that; otherwise, standard dowel material is alright as long as it is protected by a good exterior finishing product. -Glue: Use a superior-quality, exterior grade wood-bonding adhesive. There are many to choose from; read the labels carefully, or ask for assistance at your home center or hardware store for best results. -Finishing products: Use high quality, exterior-grade stains, varnishes, paints or other sealants and protectants designed for exposure to elements germane to your area. -Wood filler: You will need a small amount of wood filler, to fill the screw holes around the outer rim after final assembly.
- This article carries a few simple assumptions, such as: A.
- Make a wooden wagon wheel of this type for decoration only; no structural claims are made for functional use.
- For fitting into standard 5/4 pressure treated deck board material, spokes should be no larger than 3/4" diameter, which will leave only about 1/8" material on either side of the holes (sufficient for this decorative-only wooden wagon wheel).
Step 3
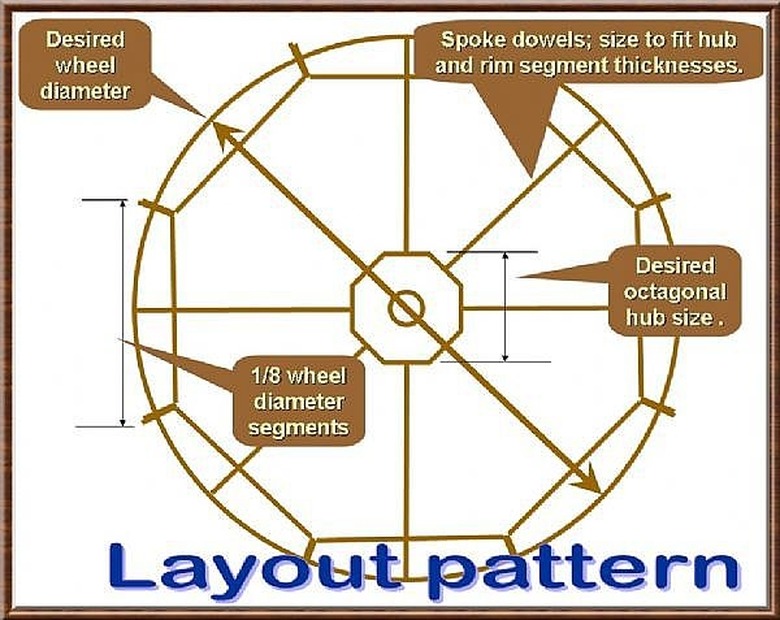
Setting up: The first thing to do as you make a wooden wagon wheel is to layout your chosen size wagon wheel on a piece of plywood or other panel large enough for the full scale drawing (or at least a half-drawing, if chosen wheel size is very large). See image for approximation of a full layout. Be careful to keep your layout to scale, and be as accurate as you can when you layout the spokes and rim segments.
Essentially, you are laying out eight equal segments of a circle; so to make a wooden wagon wheel template that's accurate, you'll have to go back to your high-school geometry and take careful measurements; that's all that's needed.
Step 4
Create a pattern for the rim-segments: In order to make your wagon wheel rim-segments all alike, it is a good idea to make a (durable) cardboard pattern, to trace and cut each piece the same.
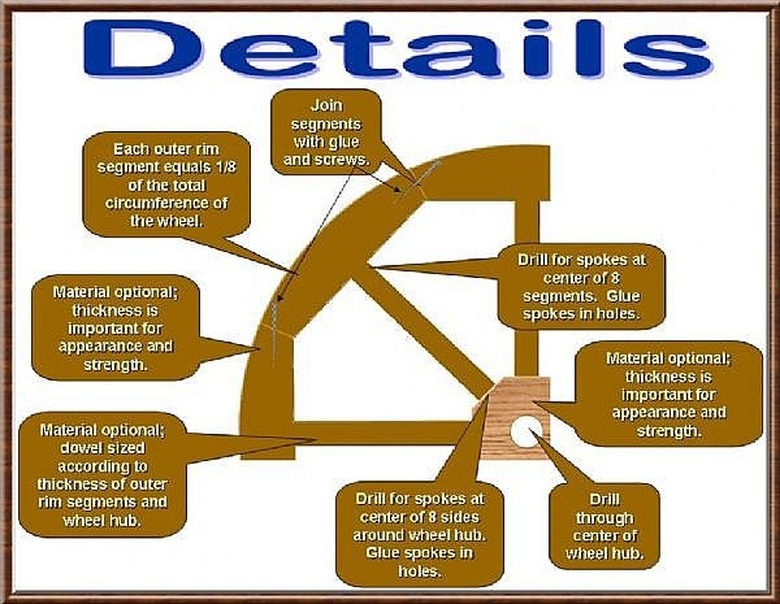
Be sure to cut the ends of these rim-segments at the proper mating angles. They will be glued and screwed to each other as shown in diagram at Step 6. Wheel hub: At least 1" thick; at least 4" across. Recommend using standard 5/4 x 6 pressure treated deck board material for wheel hub.
- Setting up: The first thing to do as you make a wooden wagon wheel is to layout your chosen size wagon wheel on a piece of plywood or other panel large enough for the full scale drawing (or at least a half-drawing, if chosen wheel size is very large).
Trace and cut the eight rim-segments, taking care to keep your cuts square and accurate.
Step 5
Cut out the center hub: Using your chosen wagon wheel hub dimensions and materials from your planning stages, layout and cut the center hub section.
Be careful to cut each of the eight sides as squarely as possible. Once cut, layout and drill appropriately sized spoke-dowel holes, centered in each of the eight sides, and penetrating at least 3/4 of an inch. Also, drill a larger hole through the center of the hub itself, as the 'axle hole'.
Step 6
Layout and cut the rim-segments: You will need eight rim-segments (all alike) to make a wooden wagon wheel that is uniform, sturdy, and attractive. Using the cardboard template/pattern you made, trace the eight rim-segment shapes onto your chosen wagon wheel material, and cut out the eight segments, keeping all cuts as square as possible.
- Trace and cut the eight rim-segments, taking care to keep your cuts square and accurate.
- Using the cardboard template/pattern you made, trace the eight rim-segment shapes onto your chosen wagon wheel material, and cut out the eight segments, keeping all cuts as square as possible.
Drill a spoke-dowel hole at the center of the flat side of the rim-segments (i.e., inside edge); penetrating at least 3/4 of an inch.
Also, drill small, angled screw-holes on the outer side of each of the rim-segments, for attaching each rim-segment to the next with long screws. See diagram.
Step 7
Cut spokes: Using your original layout pattern as a guide, cut the eight spokes to the length needed; taking into account the depths of your drilled spoke-holes in the rim-segments and the wheel hub. (i.e., if you drilled those holes to 3/4" depths, add 1 1/2").
Step 8
Sanding the pieces: After everything is cut out, drilled, and otherwise fabricated, it's time to do some sanding of the pieces so you make a wooden wagon wheel that is finished well, and will look more attractive in your yard.
Remove the burs left from the saw-cutting; square up any edges needing to be squared, and smooth out both sides of each rim-segment and the wheel hub.
- Drill a spoke-dowel hole at the center of the flat side of the rim-segments (i.e., inside edge); penetrating at least 3/4 of an inch.
- Remove the burs left from the saw-cutting; square up any edges needing to be squared, and smooth out both sides of each rim-segment and the wheel hub.
Step 9
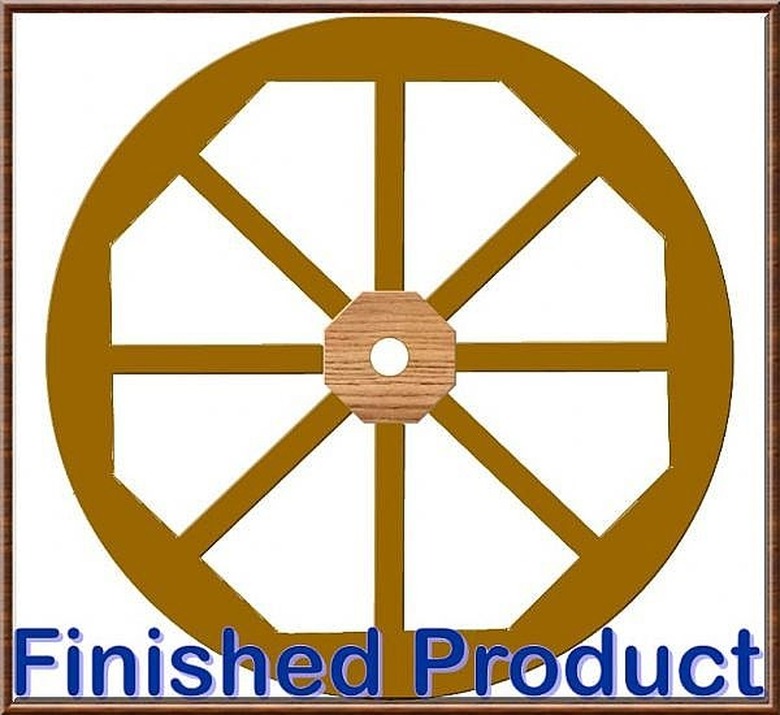
Assemble your decorative wooden wagon wheel: Now that everything is cut out and sanded, lay the pieces onto your full-scale drawing (or half drawing) to ensure they will fit correctly.
If everything checks out, start gluing the spokes into the center hub; then glue the rim-segments onto the other ends of the spokes, clamping as required.
Also, carefully screw each rim-segment to the next, to tie them all together. Once fully tightened and secure, fill screw holes with wood filler.
Wipe away excess glue, and allow to dry at least eight hours.
Step 10
Finishing: Sand down the wood filler around the outer edge; sand any other areas with rough surfaces or edges; and get ready to apply your choice of finishing products to help preserve your wooden wagon wheel in your area.
You might choose to make it look like an antique; or perhaps you would prefer something more colorful; or maybe jet-black; or white-white; or whatever suits your personal tastes! In any case, to make a wooden wagon wheel that best suits your specific needs, wants and wishes, use your personal choices and touches to make it something you are truly proud of!
- Assemble your decorative wooden wagon wheel: Now that everything is cut out and sanded, lay the pieces onto your full-scale drawing (or half drawing) to ensure they will fit correctly.
- Finishing: Sand down the wood filler around the outer edge; sand any other areas with rough surfaces or edges; and get ready to apply your choice of finishing products to help preserve your wooden wagon wheel in your area.
Tip
To help fit dowels into snug holes, gently taper the ends with a sander or file. As you attempt to make a wooden wagon wheel that is authentic looking and sturdy enough for outdoor use, be sure to apply adequate exterior-grade protective coatings and finishes as demanded by your region's climate and other impacting elements. If you prefer to make a wooden wagon wheel without the flat inner sides of each segment, you can do so simply by cutting an inside radius at the desired dimension. Be sure to take into account the needed spoke length for this, and make sure you allow enough 'meat' in the rim width to accept the spoke-hole depth of 3/4" without penetrating through! I would recommend the rim width to be no less than 2 1/2".
Warning
Read and follow all manufacturers' instructions and guidelines for safe handling, use, installation, operation and maintenance of equipment, tools, and products. Make a wooden wagon wheel you can appreciate: Use appropriate personal protective equipment and safety gear when working with tools, materials, equipment and products.